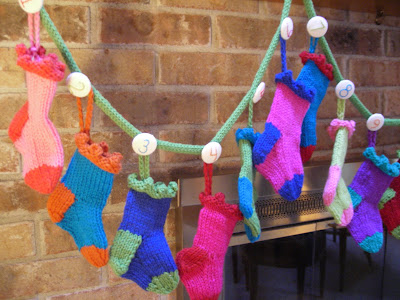
This garland has become such a happy part of our holiday tradition. And for those of you considering making these little stockings, let me assure you...you do indeed still have time. Each stocking works up in a snap—perfect for an evening sit down. And as long as you keep one day ahead you will be fine.
This year I am thinking of filling my stockings with some Teeny-Tiny Mochi Mochi goodness (shhh...don't tell the kids). I think Anna's whimsical little knits with be a perfect fit for these stockings.
The Details
I made my mini stockings with Cascade 220, because I have a lot of it and because I wanted the knitting to fly off the needles. As you can see from the color explosion here, I used this project for some serious stash busting. It's perfect for that, but if you want to make yours out of just one or two colors that would be pretty too. I think that you could get the entire project, including the I-cord garland out of a skein or two. If you have lots of DK weight wool hanging around, that would work just as well. Just keep in mind that you will need to adjust your needle size and be aware that your minis will be a little smaller.
The Stockings
Finished Size
Leg = 2 1/2" from upper edge to beginning of heel flap.Foot = 4 1/2" from back of heel to tip of toe.
Materials
For the Stockings—28 to 29 yds (13 to 15 g) worsted weight wool
US 6 double point needles
US 7 double point needles
US size G (4mm) crochet hook
Tapestry needle
Gauge
5 stitches to the inch, in Stockinette stitch, using US size 6 double point needles.Bobble Border
Using US 7 dpns and contrasting yarn (if desired), cast on 24 sts. Divide the sts evenly onto three dpns. Join work in the round.
Round 1: *Purl 3 sts, make a bobble in the next stitch. To make a bobble k1, p1, k1, p1 in the next stitch (4 sts made from 1). Turn the work, k4, turn work, p4. Do not turn work after working these last four sts, instead pass the 2nd, 3rd, and 4th stitch over the last stitch worked and off of the needle. Repeat from * around, until you are back at the beginning of the round.
Rounds 2-4: Purl. Cut contrasting yarn, leaving a long tail.
Leg
Switch to US 6 dpns, join main color, and knit until the leg measures 2 1/2" from the cast on. Cut main color.
Heel Flap
The heel flap is worked back and forth in rows as follows. Join contrast color and knit across 6 sts. Turn work and purl across 12 sts. These 12 sts make up the heel flap. Place the remaining 12 sts on a dpn or holder (these are the instep sts and will be worked later). Ignore the instep stitches while you work the remainder of the heel flap. Work back and forth on the heel flap sts as follows—
Row 1: Slip 1 st, knit across the remaining 11 sts.
Row 2: Slip 1 st, purl the remaining 11 sts.
Repeat Rows 1 and 2 until 10 rows have been worked and there are 5 long chain stitches along the each side of the heel flap, ending with a purl row.
Turn Heel
Slip 1, k6, ssk, k1, turn.
Slip 1, p3, p2tog, p1, turn.
Slip 1, k4, ssk, k1, turn.
Slip 1, p5, p2tog, p1, turn.
You will end with 8 sts. Slip 1, k3, cut yarn, ending in the middle of the heel flap.
Heel Gusset
The remainder of the stocking will be worked in the round.
With the right side of the heel flap facing you and using a separate dpn and main color, knit across the 4 remaining heel sts. Do not turn work. Instead, pick up and knit 1 st into each long chain stitch along the heel selvedge. You should now have 10 sts on this needle (if you have one more or less, don't stress, just make sure that you pick up the same number on the opposite selvedge so that the gussets match in the end). This needle, will be referred to as Needle 1 from here on out.
Using a separate US 6 dpn, knit across the 12 sts for the instep. This needle will be referred to as Needle 2.
Using another US 6 dpn, pick up and knit 1 stitch for each heel selvedge stitch as you did at the beginning of the round. Once you have picked up 6 sts, knit across the 4 remaining heel flap sts. You should now have 10 sts on this needle, Needle 3.
Round 1: Knit one round—32 sts total—10 sts on Needle 1, 12 sts on Needle 2 (the instep) and 10 sts on Needle 3.
Round 2 (decrease round): Knit to the last 3 sts on Needle 1, k2tog, k1. Knit across the instep sts (Needle 2). K1, ssk, k the remaining sts on Needle 3.
Repeat Rounds 1 and 2, until the original number of sts is restored—24 sts total. You should have 6 sts on Needles 1 and 3 and 12 sts on Needle 2.
Knit plain until the foot is approximately 2" from where you joined the main color at the end of the heel. Cut yarn.
Toe
Round 1: Join contrast color and knit one round.
Round 2 (decrease round): Knit to the last three sts of Needle 1, k2tog, k1. Knit the first st on Needle 2, ssk, k to the last 3 sts on Needle 2, k2tog, k1. Knit the first st on Needle 3, ssk, k to the end of Needle 3.—4 sts are decreased in this round.
Continue repeating Rounds 1 and 2 until 8 sts remain. Cut yarn, leaving a 8-10" tail. Thread the tail onto a tapestry needle and run the needle through the live sts on the needles, removing the needles as you do so. Pull the thread taut to draw up the toe sts, turn sock inside out, fasten off tail, and weave in the end.
Finishing
To make a hanging tag for your stocking, use the crochet hook to make a 12 to 20 stitch chain. Sew it to the top of the stocking. Weave in all remaining ends. Voila!...one cute and very quick little stocking! Assembling The Garland
I suspended my stockings on an I-cord garland. You could use a ribbon for this—we live about an hour away from everything and I didn't have the right ribbon, so I-cord it was. I used the US 6 dpns and made a 5 stitch I-cord. I spaced the stockings 4" inches apart in groups of 6, and allowed for a loop in between every section of 6 stockings, thus I ended up knitting around 5 yards of I-cord—that's about one movie.
After the buttons were made, I divided the I-cord into 4 sections, making a loop in between each section and one at each end, so that there were 5 loops in all. Then I spaced the buttons evenly along the 4 sections and sewed them to the I-cord.


Happy knitting to all and to all a good knit...
~alison


Happy knitting to all and to all a good knit...
~alison


